OAuth 2.0: Part 1 - Understanding the Basics
The OAuth 2.0
Security is a complex topic. OAuth 2.0 is no different. Even though frameworks like Spring Security help to reduce the complexity, there’s still a steep curve to understand how to properly implement security.
In this series, I will share my understanding of OAuth 2.0 and how we can implement security for a simple microservices based application using Spring Security OAuth2.
Full disclosure: I’m not a security expert. I’m just documenting what I’ve learned along the way. If you spot something off, please let me know in the comments!
Before jumping into the implementation, we will start with the concepts.
What is OAuth 2.0?
OAuth 2.0 stands for Open Authorization.
It is a system that allows one app to safely access another app on behalf of a user.
With OAuth 2.0, you (the user) can let an app use your data from another service without sharing your password.
You simply give permission, and the app can only access the things you allow.
OAuth 2.0 replaced the older OAuth 1.0 and is now the most widely used way for apps to share data securely.
Confused already? Don’t worry, it didn’t make much sense to me either at first. Things will click as we go through real examples!
Authentication vs Authorization
First off, let’s understand two basic security concepts: Authentication & Authorization
Authentication
Authentication = It checks who you are or are you the right person? (confirms your identity)
Authorization
Authorization = It checks what you are allowed to do after you are authenticated?
In Simple Words
- Authentication = Who are you?
- Authorization = What can you do?
Important: OAuth 2.0 only deals with Authorization but not Authentication.
OAuth does not tell who the user is. OpenID Connect (OIDC) specification is created to address Authentication which is built as a layer on top of OAuth 2.0.
There are many Identity Provider solutions like Keycloak, Okta, Auth0, etc.
OAuth 2.0 Components
To quickly summarize, in an OAuth 2.0 system there are various components that play different roles and there are different approaches to authenticate a user.
OAuth 2.0 Roles
Resource Owner: The resource owner is typically the end user, who authorizes an application (Client) to access his/her account.
Resource Server: Server hosting the protected resources. This is the API you want to access.
Client: An application (which Resource Owner is using) requesting access to a protected resource on behalf of the Resource Owner.
Authorization Server: Server that authenticates the Resource Owner and issues access tokens after successful authorization.
OAuth 2.0 Grant Types
OAuth 2.0 supports several grant types (flows) for different use cases:
- Authorization Code Flow
- Authorization Code Flow with PKCE
- Client Credentials Flow
- Implicit Flow (not recommended)
- Resource Owner Password Flow (not recommended)
We’ll explore these in detail in upcoming parts of this series.
Understanding OAuth 2.0 with a Real Example
Let’s understand this with a practical example that you might encounter in real life.
The Scenario
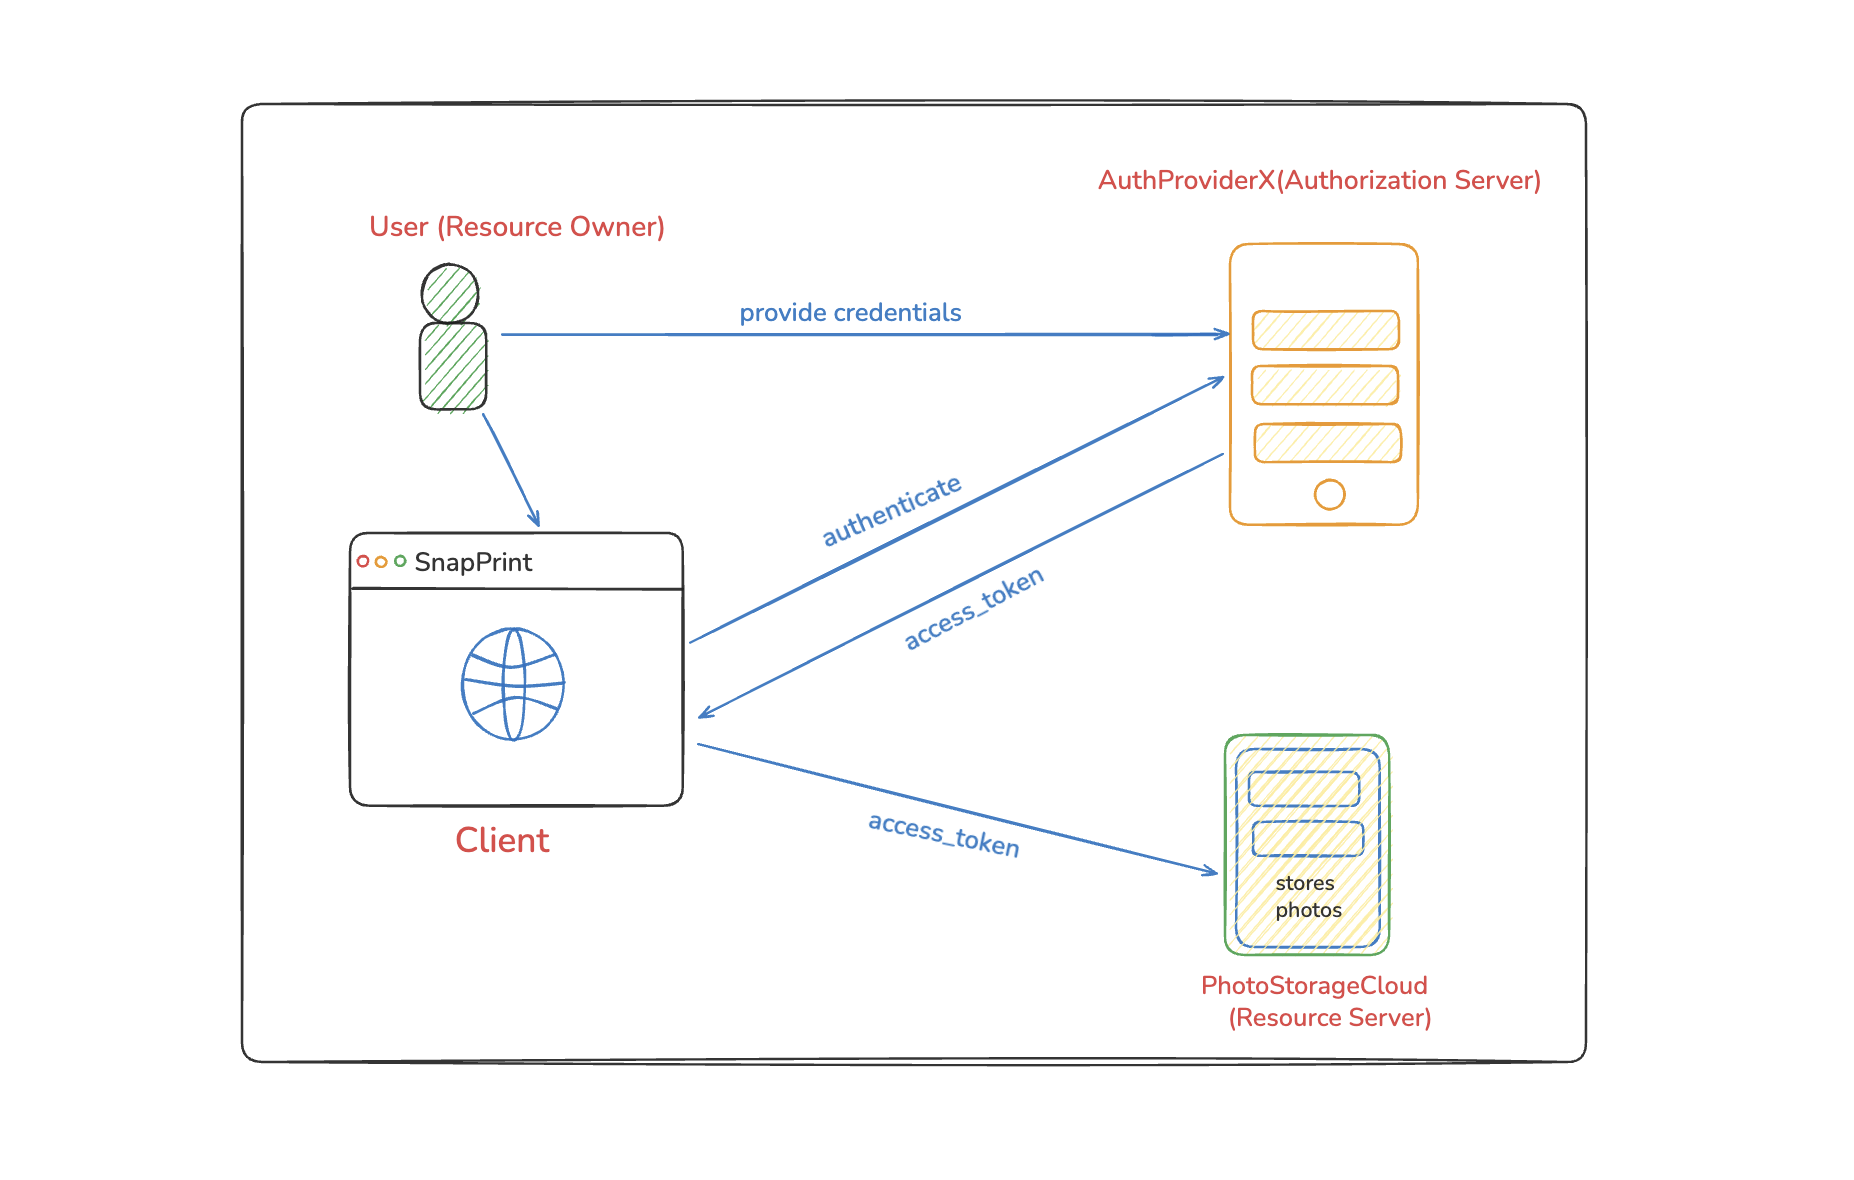
Imagine you want to use SnapPrint (a photo editing app) to edit your photos that are stored on PhotoStorageCloud (a cloud storage service).
Let’s break down how OAuth 2.0 makes this possible securely:
1. The User Wants SnapPrint to Access Their Photos
The Resource Owner (the end user) attempts to use the SnapPrint app to edit or print photos.
But their photos are not stored inside SnapPrint — they live on PhotoStorageCloud, a completely different company with its own protected API.
SnapPrint cannot access any of those private photos directly.
2. Photos Are Protected - SnapPrint Needs an Access Token
PhotoStorageCloud exposes its API only to clients who present a valid access_token.
This access_token proves that:
- The user has authenticated
- The user gave SnapPrint permission to access their photos
Without this token, PhotoStorageCloud will reject all requests.
3. SnapPrint Delegates Authentication to AuthProviderX
Instead of building its own login system, SnapPrint delegates everything to an external Authorization Server called AuthProviderX.
AuthProviderX handles:
- User authentication
- Consent screens
- Issuing access_tokens
- Token security and expiration
SnapPrint never sees the user’s password.
4. User Authenticates and Gives Consent
When the user clicks “Import My Photos,” SnapPrint redirects them to AuthProviderX’s secure OAuth 2.0 login page.
Here the user:
- Signs in using username/password or social login
- Sees a consent page asking:
“Allow SnapPrint to access your PhotoStorageCloud photos?” - The user explicitly approves this
5. AuthProviderX Issues an Access Token
If authentication succeeds and the user consents, AuthProviderX generates a signed access_token and sends it back to SnapPrint.
This token represents:
- Who the user is
- Which permissions SnapPrint was granted
- How long the access lasts
SnapPrint stores this token securely.
6. SnapPrint Uses the Token to Access Photos
SnapPrint now attaches the access_token to its API requests:
GET /user/photos
Authorization: Bearer <access_token>
PhotoStorageCloud verifies the token’s signature and permissions.
If the token is valid, the server returns only the photos the user allowed SnapPrint to access.
SnapPrint can now import, display, and edit the photos without ever knowing the user’s credentials.
The Beauty of OAuth 2.0: Secure, Limited, Revocable Access
With OAuth 2.0:
- SnapPrint never touches the user’s password
- The user grants limited access (photos only, not account settings)
- The user can revoke access anytime from AuthProviderX
- PhotoStorageCloud trusts the access_token, not SnapPrint directly
This is the power of OAuth 2.0 — secure delegation of access without sharing credentials.
What’s Next?
In this introduction, we’ve covered the what and why of OAuth 2.0. We’ve seen how it separates authentication from authorization and how it enables secure, limited access to resources.
In Part 2 of this series, we’ll dive deeper into:
- OAuth 2.0 Grant Types in detail
- Authorization Code Flow step-by-step
- PKCE (Proof Key for Code Exchange) and why it matters
- When to use which grant type
Key Takeaways
- OAuth 2.0 is about Authorization, not Authentication
- It allows apps to access resources without sharing passwords
- Four main roles: Resource Owner, Client, Authorization Server, Resource Server
- Access tokens are the key to secure resource access
- Users maintain control and can revoke access anytime
Ready to explore OAuth 2.0 grant types? See you in Part 2! 🚀
📚 Series: OAuth 2.0
Part 1 of 2
Comments
Join the discussion and share your thoughts